Tipps & Tricks:
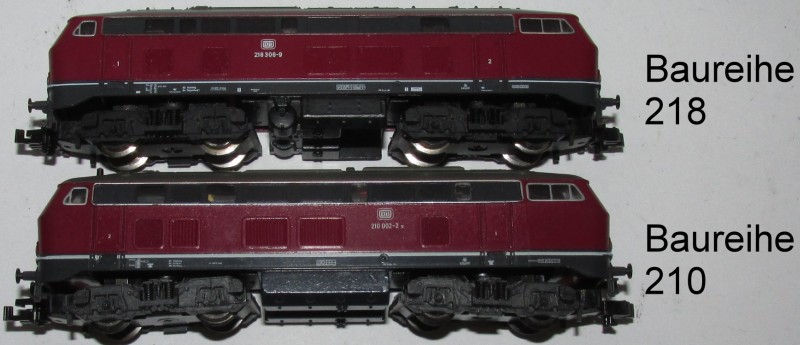
Einbau einer Schwungmasse in eine Fleischmann 210 /
Installation of a flywheel into an Fleischmann series 210

Bild US-Oldtimer-Dampflokomotive


Flagge Deutschland - Sprache=deutsch
Die Fleischmann 210 (7232/7233) bzw. 218.9 (7233, 210 nach Ausbau der Gasturbine) gab es nie mit einer Schwungmasse, aber neuere Konstruktionen der 218 verfügen über einen entsprechenen Antrieb. Prinzipiell ist des möglich, das Gehäuse der 210 zu nehmen und auf das Fahrgestell einer solchen 218 zu setzen. Leider aber hatte die 210 einen anderen Tank als die 218 und der Tank ist Bestandteil des Fahrrahmens. Auf dem Vergleichsbild ist dies gut zu sehen (Bauteil zwischen den Drehgestellen):
Flagge Großbritannien - Sprache=englisch
The Fleischmann 210 (7232/7233) or 218.9 (7233, 210 after disassembling of the gas turbine) never had any flywheel, but newer constructions of the 218 do. So why not using the loco chassis of such a 218 and put the body of the 210 on it? This works, but there's a little problem: the 210 had another tank than the 218 and the tank is part of the loco chassis. The first picture is a comparision between a 218 and a 210. The tank is the part between the bogies:

Fleischmann 210 Schwungmassen-Tipp, Bild 1 / flywheel tip picture 1
Abbildung 1 / picture 1


Flagge Deutschland - Sprache=deutsch
Ich habe für meine Arbeit an der 210 002-2 (7232) eine gebrauchte 218 390-3 (7235) verwendet. Bei gebrauchten 218er'n muss man sich ggf. vorab vergewissern, ob das Modell auch eine Schwungmasse hat: Ältere Ausführungen einer Lok mit der gleichen Nummer haben eher keine Schwungmasse und das gilt auch für Loks aus Anfangspackungen.
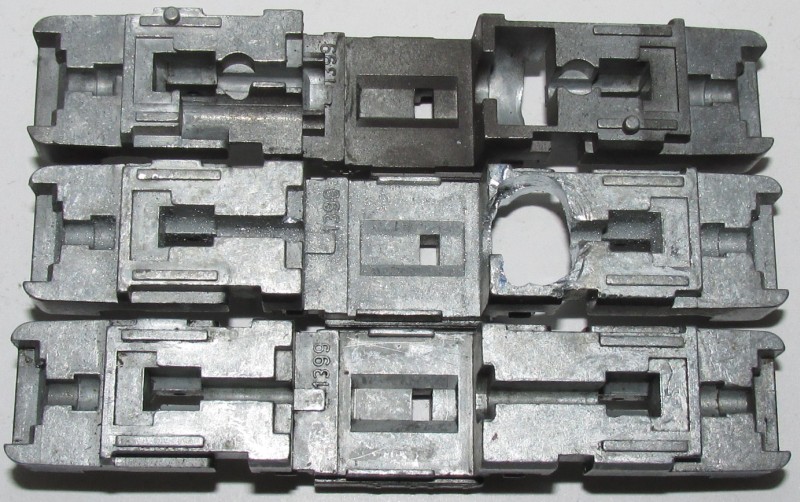
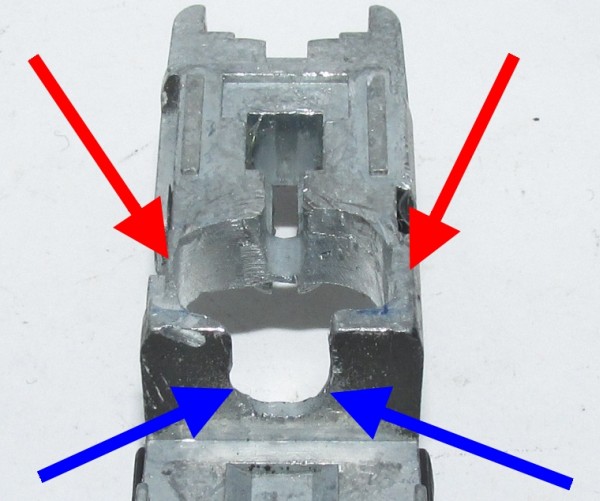
Als erstes werden nun beide Loks zerlegt. Dabei sollte man sich die Lage der Drehgestelle der alten Lok merken, da die Kontakte der Drehgestelle unterschiedlich angeordnet sind. Ansonsten fährt die Lok nachher verkehrt herum.
Nun ist erst einmal handwerkliche Arbeit angesagt: Der Fahrrahmen der 210 muss ausgefäst werden, um Platz für die Schwungmasse zu schaffen. Man kann dazu den Fahrrahmen ganz gut in Höhe des (zu polsternden) Tanks in einen Schraubstock einspannen.
Als Vorlage für die anstehende Arbeit nimmt man sich den Schwungmassen-Fahrrahmen einer 218. Abbildung 2 zeigt oben eine solche Vorlage, unten den unbehandelten Rahmen einer 210 und in der Mitte die fertige Fräsarbeit. Zum Glück sieht man das später von außen nicht mehr:
Flagge Großbritannien - Sprache=englisch
I took a used 218 390-3 (7235) for my work on my 210 002-2 (7232). If you buy a used 218, you'll have to ask if there's a flywheel in it. Older constructions of an engine with the same number didn't had any. That's the same for engines of a beginner's package.
The first step is to disassemble both engines. Please remember the position of the bogies of the old engine, because the layout of the contacts of the two bogie gear boxes is different. If you change this, the engine will run in the wrong direction.
Now it's time for bigger work: you have to cut out the loco chassis so that there's place enough for the flywheel. You can clamp the chassis on heigth of the tank (has to be upholstered) into a vice. Use the chassis of the "flywheel"-218 as a model. The next picture shows such a chassis on top, the bottom chassis is the original one of a 210 and in the mid is my work's result. It's good that you don't see this anymore after the body is on its chassis:

Fleischmann 210 Schwungmassen-Tipp, Bild 2 / flywheel tip picture 2
Abbildung 2 / picture 2


Flagge Deutschland - Sprache=deutsch
Der Fahrwerkrahmen muss auch an der Stelle erweitert werden, die sich später zwischen Motor und Schwungmasse befindet. Das ist in Abbildung 3 mit den blauen Pfeilen dargestellt. Aufpassen muss man, dass der Rahmen an den Außenseiten des Schwungmassenausschnitts nicht zu dünn wird (rote Pfeile).
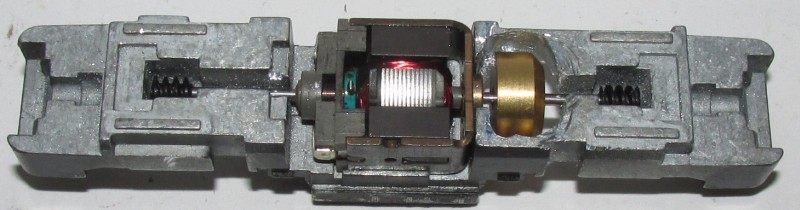
Mit einem Fräsaufsatz auf eine Mini-Bohrmaschine war es jedoch nicht getan. Erst mit "schwererem" Gerät (AEG Fixtec Plus 1010W) ging die Arbeit halbwegs schnell voran.
Flagge Großbritannien - Sprache=englisch
You have to extend the part of the chassis as shown with the blue arrows on the next picture, too. Later, that's the position between motor and flywheel. Please take care that the side parts of the opening don't get too thin (red arrows).
Using a mini drill machine was not a good choice. Visible success of my work was the result only as I used a "slightly" bigger machine (AEG Fixtec Plus 1010W).

Fleischmann 210 Schwungmassen-Tipp, Bild 3 / flywheel tip picture 3
Abbildung 3 / picture 3


Flagge Deutschland - Sprache=deutsch
Während der Fräsarbeiten sollte man immer wieder die Lage der Schwungmasse ausprobieren. Der Motor muss sich drehen lassen:
Flagge Großbritannien - Sprache=englisch
During work it helps to try out the position of the flywheel. If the motor turns round without resistance, you'll have done a good job:

Fleischmann 210 Schwungmassen-Tipp, Bild 4 / flywheel tip picture 4
Abbildung 4 / picture 4


Flagge Deutschland - Sprache=deutsch
Der letzte Schritt vor dem Zusammenbau ist das Reinigen und Nachlackieren des Rahmens. Als Reiniger habe ich Isopropanol (bekommt man in der Apotheke) verwendet. Die passende Farbe ist beispielsweise Elita Life Colours RAL 9005:
Flagge Großbritannien - Sprache=englisch
The last step before reassembling the engine is to clean the loco chassis and to paint all parts black again, that are visible from the outside. I used isopropanol for cleaning and Elita Life Colours RAL 9005 for painting:

Fleischmann 210 Schwungmassen-Tipp, Bild 5 / flywheel tip picture 5
Abbildung 5 / picture 5


Flagge Deutschland - Sprache=deutsch
So sieht das komplettierte und nun zu testende Fahrwerk aus:
Flagge Großbritannien - Sprache=englisch
Now, that's the complete loco chassis. Good luck with your first test:

Fleischmann 210 Schwungmassen-Tipp, Bild 6 / flywheel tip picture 6
Abbildung 6 / picture 6


Fotos: Georg Blees mit Canon SX-160IS - all photos: Georg Blees with Canon SX-160IS


Bild Pfeil links     zur Übersicht / overview     Bild Pfeil links                         Bild Pfeil hoch     zum Seitenanfang / top      Bild Pfeil hoch

erstellt von / created by: Georg Blees 10.04.2013; letzte Änderung / last modified: Georg Blees 01.08.2015