Tipps & Tricks:
Kupplungshaken und Bremsschläuche für Hobbytrain E 10.3 /
coupling hook and brake hoses for Hobbytrain E 10.3

Bild US-Oldtimer-Dampflokomotive


Flagge Deutschland - Sprache=deutsch
Die Minitrix 217 verfügt über Kupplungshaken und Bremsschläuche (Trix E180834) für beide Lokseiten. Genutzt habe ich diese Bauteile jedoch nur für eine Seite und konnte somit eine andere Lok mit dem Rest ausrüsten. Hierzu ist die Hobbytrain E 10 432 ein sehr guter Kandidat. Zunächst wird das Gehäuse entfernt und man widmet sich dem Frontdrehgestell. Die Kupplungsaufnahme ist im Weg und muss entfernt werden, wozu man den hier mit dem roten Pfeil markierten Stift heraus zieht und dann die Kupplungsaufnahme und die Feder entfernt:
Flagge Großbritannien - Sprache=englisch
My Minitrix 217 had two sets of coupling hook and brake hoses (Trix E180834), but I only needed one set. So what to do with the other one? The Hobbytrain E 10 432 was a very good candidate. First off all, take away the car body. The next task is the front bogie where you have to disassemble the fastener of the coupler, which means to pull the bolt (see red arrow) out of the fastener and then to take away the fastener and the spring:

Kupplungshaken und Bremsschläuche für Hobbytrain E 10.3, Bild 1 / coupling hook and brake hoses for Hobbytrain E 10.3, picture 1   Kupplungshaken und Bremsschläuche für Hobbytrain E 10.3, Bild 2 / coupling hook and brake hoses for Hobbytrain E 10.3, picture 2
Abbildung 1 und 2 / picture 1 and 2


Flagge Deutschland - Sprache=deutsch
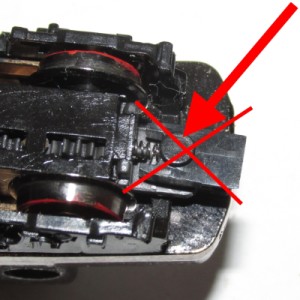
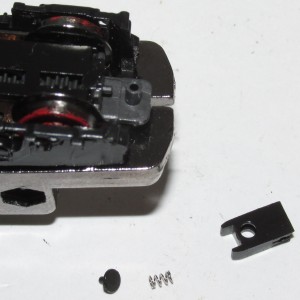
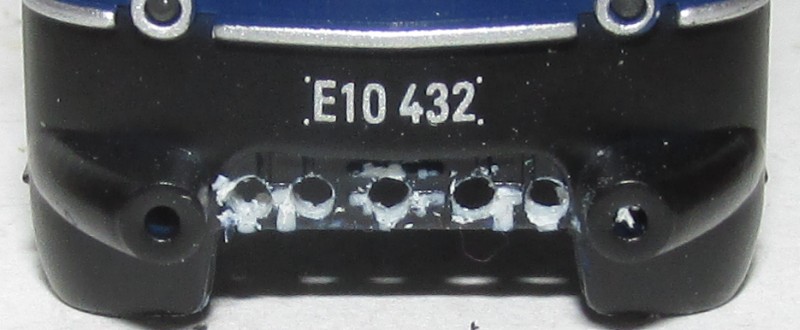
Nun nimmt man sich wieder das Gehäuse vor und entfernt zunächst auf der gewünschten Seite die Puffer, bevor man im Kupplungsbereich alle 
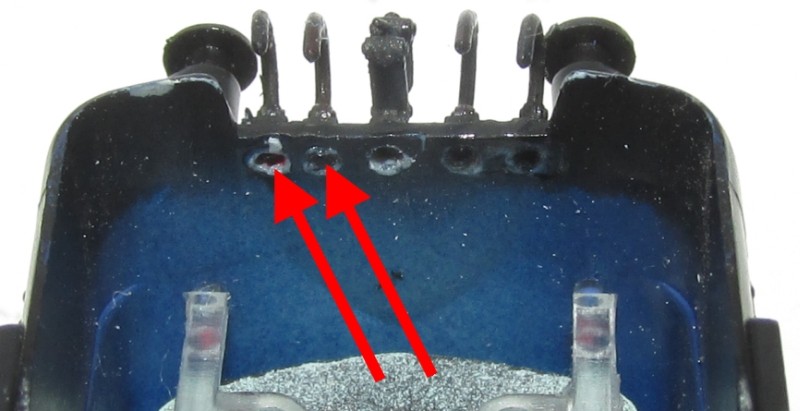
erhabenen Teile, zum Beispiel mit einem Bastelmesser, vorsichtig entfernt. Aber Achtung: Nicht die Hebel im oberen Bereich entfernen, die hier bereits rot lackiert sind (siehe rote Pfeile):
Flagge Großbritannien - Sprache=englisch
Now, you take the car body where you have to cut away all salient parts (be careful) - but not the upper hand gears which you see here already painted red (red arrows). Before you start, please pull away the buffers:

Kupplungshaken und Bremsschläuche für Hobbytrain E 10.3, Bild 3 / coupling hook and brake hoses for Hobbytrain E 10.3, picture 3
Abbildung 3 / picture 3


Flagge Deutschland - Sprache=deutsch
Im nächsten Schritt werden die Löcher für die Bauteile mit einem 0,5 mm Bohrer vorgebohrt. Hierzu wird keine Maschine benötigt - besser geht es, wann man den Bohrer zwischen Daumen und Zeigefinger nimmt:
Flagge Großbritannien - Sprache=englisch
The next step is to pre-drill the holes with a 0.5 mm drill (no machine necessary, thumb and trigger finger are a better choice):

Kupplungshaken und Bremsschläuche für Hobbytrain E 10.3, Bild 4 / coupling hook and brake hoses for Hobbytrain E 10.3, picture 4
Abbildung 4 / picture 4


Flagge Deutschland - Sprache=deutsch
Mit einem 1 mm Bohrer werden die Löcher nun erweitert:
Flagge Großbritannien - Sprache=englisch
To have enough space for the coupling hook and brake hoses, repeat drilling with a 1 mm drill:

Kupplungshaken und Bremsschläuche für Hobbytrain E 10.3, Bild 5 / coupling hook and brake hoses for Hobbytrain E 10.3, picture 5
Abbildung 5 / picture 5


Flagge Deutschland - Sprache=deutsch
Die Bauteile habe ich bereits matt nachlackiert (Revell Emailfarbe). Diese Bauteile werden nun sukzessive montiert. Dazu füllt man ein wenig Plastikkleber auf die Rückseite zweier Löcher für die Bremsschläuche (auf der Innenseite des Gehäuses), steckt die ersten beiden Bremsschläuche mit Hilfe einer Pinzette vorsichtig ein und richtet die Teile aus. Sobald der Klebstoff trocken ist, wiederholt man den Vorgang für die andere Seite und schließlich für den Kupplungshaken:
Flagge Großbritannien - Sprache=englisch
I've alreay painted the coupling hook and brake hoses with matt colour (Revell Email). Now, fill a bit of plastic glue on the back of two holes for the brake hoses (on the inside of the car body) and carefully put the first two brake hoses into the holes (use tweezers). Don't forget to align the parts! After the glue is dry, repeat the task for the other two brake hoses and later for the coupling hook:

Kupplungshaken und Bremsschläuche für Hobbytrain E 10.3, Bild 6 / coupling hook and brake hoses for Hobbytrain E 10.3, picture 6
Abbildung 6 / picture 6


Flagge Deutschland - Sprache=deutsch
Zum Schluß wird die Bastelei noch farblich ausgebessert:
Flagge Großbritannien - Sprache=englisch
To finish everything, a bit colour is very helpful:

Kupplungshaken und Bremsschläuche für Hobbytrain E 10.3, Bild 7 / coupling hook and brake hoses for Hobbytrain E 10.3, picture 7
Abbildung 7 / picture 7


Fotos/photos: Georg Blees mit / with Canon Powershot SX-160IS


Bild Pfeil links     zur Übersicht / overview     Bild Pfeil links                         Bild Pfeil hoch     zum Seitenanfang / top      Bild Pfeil hoch

erstellt von / created by: Georg Blees 23.12.2014; letzte Änderung / last modified: Georg Blees 23.12.2014